 Add Your Product Logo to the Skin
To add your product logo to the skin header, follow the steps below:
-
Import your product logo to your Flare project.
-
Open the appropriate skin:
-
Project Organizer > Skins > Side Navigation
-
Project Organizer > Skins > Accruent Access > NewSkin
-
-
Click the Styles tab.
By default, you will land on the Web Medium view.
-
Open Logo > Background.
-
Click the Select Image button.
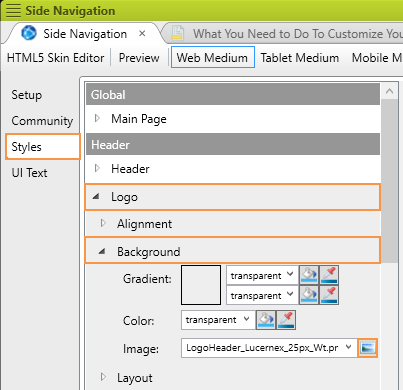
The Insert Image modal window opens.
-
Click the Ellipses button.
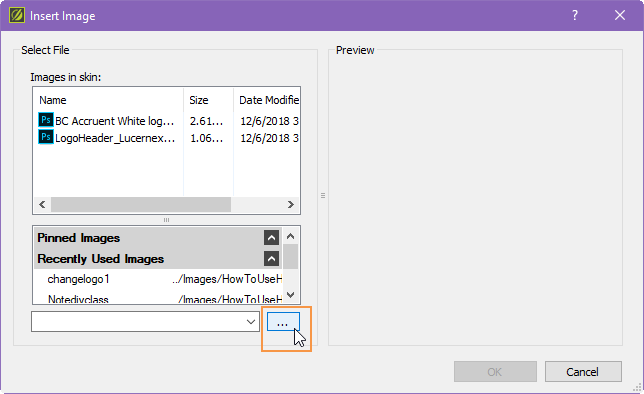
A file selection window opens.
-
Select your logo file.
All product logo files are in the Content > Resources > Images > ProductLogos folder.
-
Click the OK button.
The file selection window closes.
-
Click the OK button.
The new logo is selected.
-
Save your changes.
Click the Tablet Medium and Mobile Medium tabs at the top of the skin editor and ensure that your logo populated for all mediums.

Select the Buttons in Your Topic Toolbar
There are seven default buttons that you may use in your Flare project, but you may find that some are not relevant.
Remove buttons you do not think are appropriate from your topic toolbar.
To select the buttons in your Topic Toolbar, follow the steps below:
-
Open Project Organizer > Skins > Topic Toolbar.
-
Click the Setup tab.
All pre-configured buttons appear in the Selected column by default.
The pre-configured buttons are described below:
-
Home — Can be configured to link to the home page of your Online Help or another link as necessary.
To configure the Home button, follow the steps below:
-
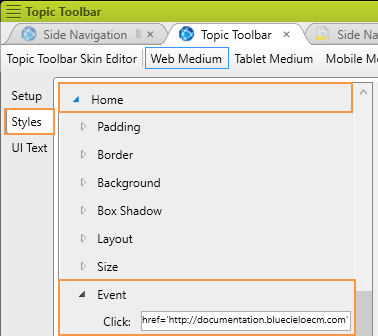
Click the Styles tab of the Topic Toolbar skin.
-
Open the Toolbar Button > Home > Events setting.
-
Change the path of the file to your preferred link.
-
An example of how to link to the home page of your Online Help appears below:
document.location.href='0_ONLINEHELP.htm'
In this example, the home page was located in the Content > Online Help folder. If you are having trouble linking to your home page, reach out to Flare Support.
04/02/2019 - The Home button has been giving us issues. If at all possible, hard-code your Home URL.
-
An example of how to link to another link outside of the Online Help appears below:
document.location.href='http://documentation.bluecieloecm.com'
-
-
Save your changes.
-
-
Print — Launches system print function for the topic.
In order for the contents of togglers to be included in the output, they must be expanded.
-
PDFLTR — Opens a link to a LTR sized PDF. This must be pre-generated.
This will be mostly used in BlueCielo Flare projects.
To configure the PDFLTR button, follow the steps below:
-
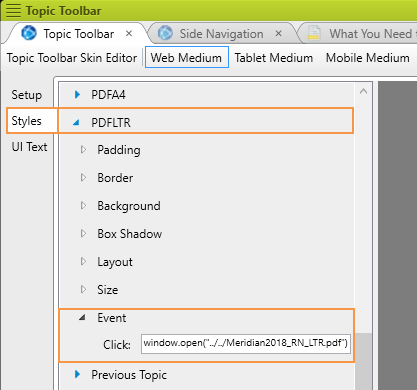
Click the Styles tab of the Topic Toolbar skin.
-
Open the Toolbar Button > PDFLTR > Events setting.
-
Change the path of the file to your LTR sized PDF.
-
Save your changes.
-
-
PDFA4 — Opens a link to an A4 sized PDF. This must be pre-generated.
This will be mostly used in BlueCielo Flare projects.
To configure the PDFA4 button, follow the steps below:
-
Click the Styles tab of the Topic Toolbar skin.
-
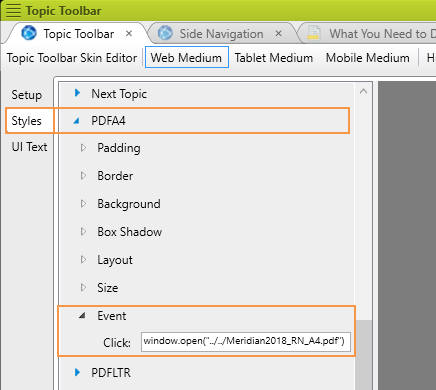
Open the Toolbar Button > PDFA4 > Events setting.
-
Change the path of the file to your A4 sized PDF.
-
Save your changes.
-
-
Back — Takes you to the last page you visited.
-
Forward — After clicking the Back button, clicking the Forward button will take you to the next page you visited.
-
Previous Topic — Opens the previous topic in the Table of Contents.
-
Next Topic — Opens the next topic in the Table of Contents.
Please choose between using the Back / Forward and the Previous Topic / Next Topic buttons. Do not use both.
-
Expand All / Collapse All — Expands and collapses all togglers on the page.
-
-
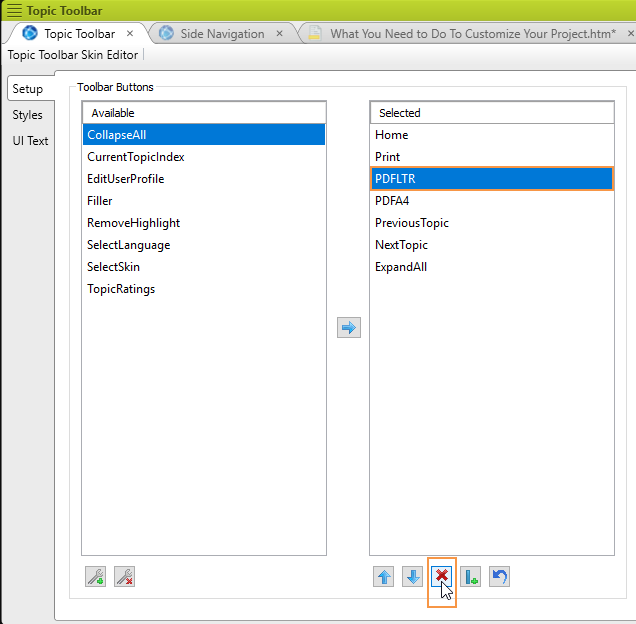
To remove a button from the topic toolbar, follow the steps below:
-
Select the button you want to remove.
-
Click the red X button at the bottom of the Selected field.
-
Save your changes.
-
-
To re-add a button to the topic toolbar, follow the steps below:
-
Select the button you want to add.
-
Click the right arrow button between the Available and Selected columns.
-
Save your changes.
-
Choose Your Master Page
There are three Master Pages in this project: the Feedback Survey Master Page, the No-Survey Master Page, and the Hidden Pages Master Page.
What is a Master Page?
A Master Page is a template that allows you to apply default elements to your topics. A Master Page includes your breadcrumbs, your topic toolbar, your footer, and a feedback survey if you choose to include it.
You can choose to have one or multiple Master Pages for your project. This project has three Master Pages:
-
Feedback Survey Master Page — includes a feedback survey powered by JavaScript and connected to Google Analytics.
-
No-Survey Master Page — does not have a feedback survey, but still connected to Google Analytics.
-
Hidden Pages Master Page — does not have a feedback survey, but still connected to Google Analytics. This page should be used for pages that are not included in your Table of Contents, but will be linked to using context sensitivity. For example, 360Facility has hidden pages that contain information about Accruent's Support and PS Tools.
Apply a Single Master Page
If you plan on only using one Master Page for your project, you can apply it at the Target-level.
If you decide later to use multiple Master Pages, you will need to undo this setting and then follow the Apply Multiple Master Pages procedures below.
To apply a single Master Page, follow the steps below:
-
Open Project Organizer > Targets > Side Navigation.
-
Click the Advanced tab.
-
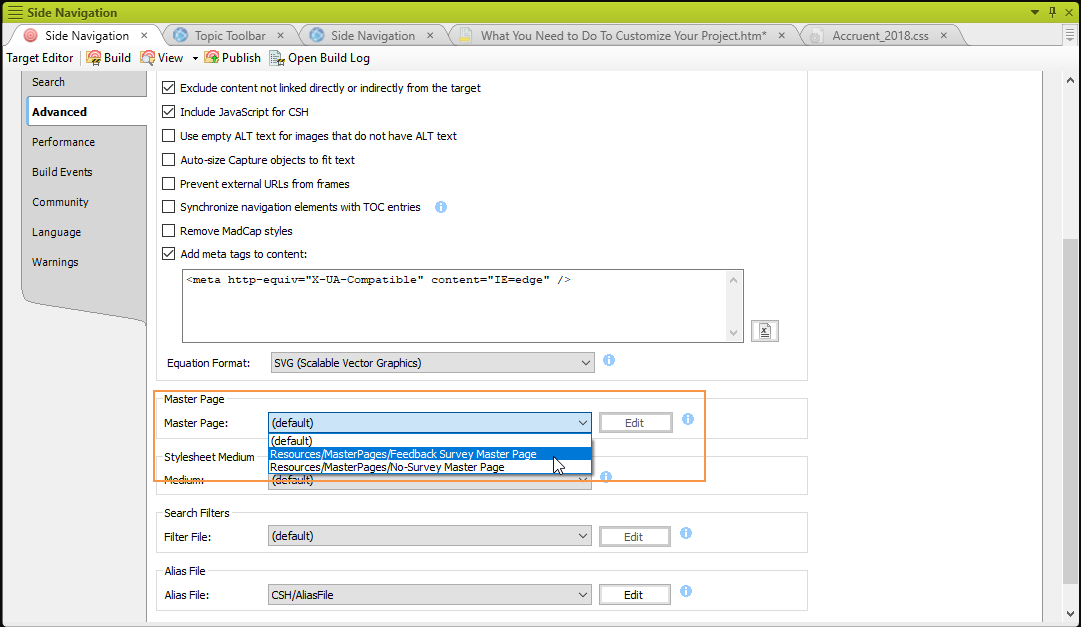
Scroll down to the Master Page section.
-
Select the Master Page you want to use from the Master Page drop-down menu.
-
Save your changes.
Apply Multiple Master Pages
If you want to apply one Master Page to a subset of pages and another Master Page to a different subset of pages, there is a quick and easy way to do so.
To assign a Master Page in bulk, follow the steps below:
-
Click the View tab in Flare.
-
Click the File List button.
The File List opens.
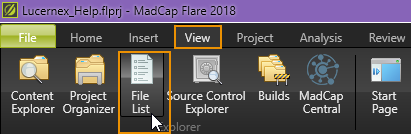
The View > File List button.
-
Select a topic to which you want to assign a Master Page.
-
Hold the CTRL or the SHIFT button on your keyboard.
-
Select a range of topics, or multiple individual topics to which you want to apply the Master Page.
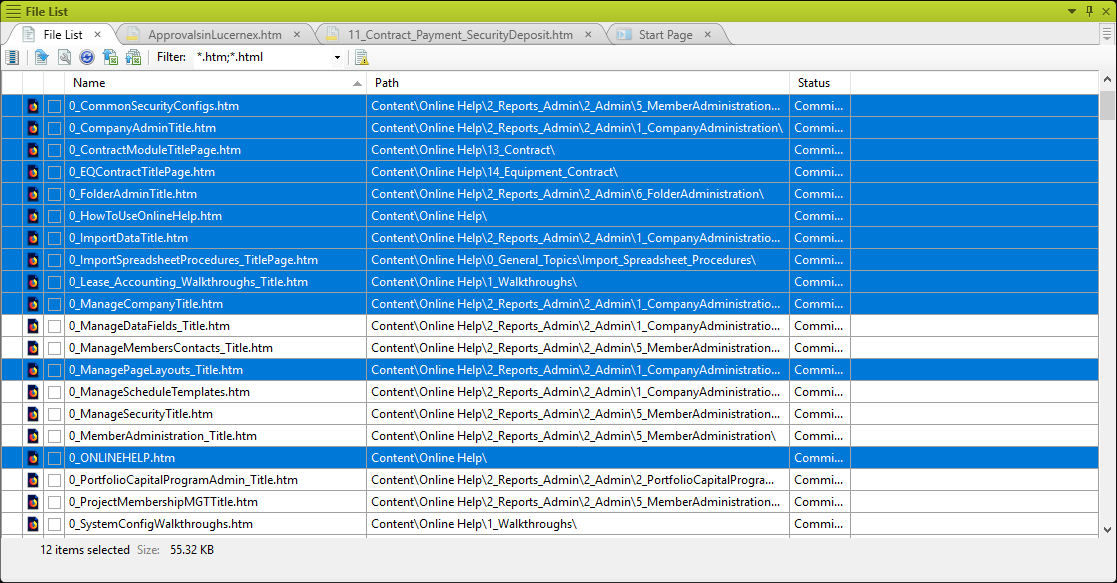
In this screen shot, I have selected multiple topics to which I want to apply the Master Page.
-
Right-click one of the selected topics, and select Properties from the drop-down menu that appears.
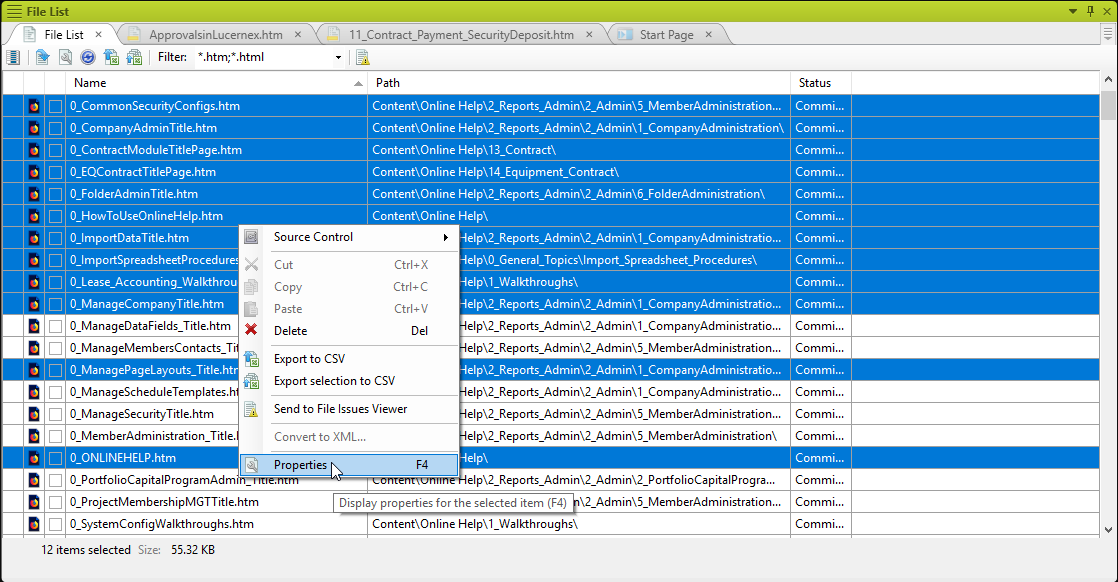
The Properties modal window opens.
-
Select Properties from the drop-down menu.
-
Select the Topic Properties tab of the Properties modal window.
The Topic Properties section opens.
-
Select the Master Page that you want to apply to your selected topics from the Master Page drop-down menu.
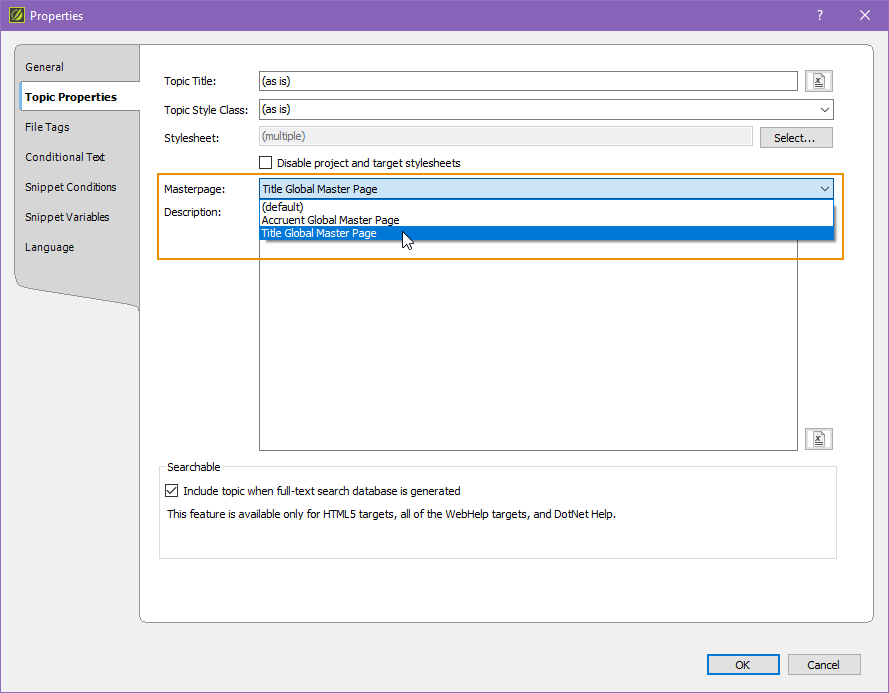
Master Page drop-down menu.
-
Click the OK button.
The Properties modal window closes. The Master Page is applied to the topics you selected.
Apply a Master Page to a Topic When You Create the Topic
To apply a Master Page to a topic after you've created a topic, follow the steps below:
-
Right-click the topic.
-
Select Properties from the drop-down menu that appears.
The Properties modal window opens.
-
Select the Topic Properties tab.
-
Select the Master Page you want to use from the Master Page drop-down menu.
-
Click OK.
The Properties modal window closes.
-
Save your changes.
Configure Your Master Page
You will need to make some small adjustments to your MasterPages for them to function properly.
Feedback Survey Master Page
You will use the Feedback Survey Master Page if you choose to use Google Analytics to track user data and feedback. For more information about the steps you need to take to properly configure Google Analytics in your Flare project, see Ken and Liz's Confluence page here.
These procedures can also be used for the Accruent Access and No-Breadcrumbs Master Pages.
To configure the Feedback Survey Master Page, follow the steps below:
-
Open Content Explorer > Content > Resources > MasterPages > Feedback Survey Master Page.
-
Click the Text Editor tab at the bottom of the XML Editor.
-
Make changes according to the specifications below.
The Feedback Survey Master Page includes the following elements:
-
A reference to the new stylesheet
DO NOT remove! If necessary, you may adjust the file path.
-
A reference to a Google Analytics snippet
DO NOT remove!
You will need to configure this reference so that it links to the correct Google Analytics snippet. See Ken and Liz's explanation for how to find this value here.
-
A reference to the GoogleTagManager script
DO NOT remove!
-
A reference to the GoogleFeedbackEvents script
DO NOT remove!
-
The HTML5 Topic Toolbar proxy
DO NOT remove!
-
The contentbody div
DO NOT remove or change! This makes the footer appear at the bottom of the page.
-
The breadcrumbs proxy
DO NOT remove!
-
The Google Analytics feedback survey
Edit line 44 to include your product-documentation-specific email address.
-
The responsive footer
DO NOT remove!
-
-
Save your changes.
No-Survey Master Page
These procedures can also be used for the Accruent Access and No-Breadcrumbs Master Pages.
To configure the No-Survey Master Page, follow the steps below:
-
Open Content Explorer > Content > Resources > MasterPages > No-Survey Master Page.
-
Click the Text Editor tab at the bottom of the XML Editor.
-
Make changes according to the specifications below.
The No-Survey Master Page includes the following elements:
-
A reference to the new stylesheet
DO NOT remove! If necessary, you may adjust the file path.
-
A reference to a Google Analytics snippet
OK to remove if you are not using Google Analytics
If you are using Google Analytics, you will need to configure this reference so that it links to the correct Google Analytics snippet. See Ken and Liz's explanation for how to find this value here.
-
A reference to the GoogleTagManager script
OK to remove if you are not using Google Analytics
-
The HTML5 Topic Toolbar proxy
DO NOT remove!
-
The contentbody div
DO NOT remove or change! This makes the footer appear at the bottom of the page.
-
The breadcrumbs proxy
DO NOT remove!
-
The responsive footer
DO NOT remove!
-
-
Save your changes.
Hidden Pages Master Page
To configure the Hidden Pages Master Page, follow the steps below:
-
Open Content Explorer > Content > Resources > MasterPages > Hidden Pages Master Page.
-
Click the Text Editor tab at the bottom of the XML Editor.
-
Make changes according to the specifications below.
The Hidden Pages Master Page includes the following elements:
-
A reference to the new stylesheet
DO NOT remove! If necessary, you may adjust the file path.
-
A reference to a Google Analytics snippet
OK to remove if you are not using Google Analytics
If you are using Google Analytics, you will need to configure this reference so that it links to the correct Google Analytics snippet. See Ken and Liz's explanation for how to find this value here.
-
A reference to the GoogleTagManager script
OK to remove if you are not using Google Analytics
-
The HTML5 Topic Toolbar proxy
DO NOT remove!
-
The contentbody div
DO NOT remove or change! This makes the footer appear at the bottom of the page.
-
The HiddenPagesToolbar div
DO NOT remove or change! This div formats how the page appears without breadcrumbs.
-
The breadcrumbs proxy
DO NOT remove!
-
The responsive footer
DO NOT remove!
-
-
Save your changes.
Footer
When your project is incorporated into Accruent Access, you will need to exclude the footer from your Output. I have created a Condition called ExcludefromAccruentAccess which has been applied to the footer. When you create your target for Accruent Access, make sure to exclude that condition from your Output.
Make sure to include this condition in your non-Accruent Access target.
Configure Your Target
There are several things you will need to do to configure your target prior to it being ready for building.
To configure your target, follow the steps below:
-
Open Project Organizer > Targets > Side Navigation.
-
Click the General tab.
-
Perform the following actions on the General tab:
-
Select the home page for your Online Help from the Startup Topic drop-down menu.
-
Select your Master TOC from the Master TOC drop-down menu.
-
If you have placed the stylesheet in a location other than the Stylesheets folder, select the stylesheet from the Master Stylesheet drop-down menu.
-
-
Select the Conditional Text tab.
-
Perform the following actions on the Conditional Text tab:
-
Select the check box in the Include column for all conditions you want to include in your output.
-
Select the check box in the Exclude column for all conditions you want to exclude from your output.
-
-
If you are configuring your Accruent Access target, follow the steps below:
-
Select the Search tab.
-
Enter the root URL of your Accruent Access content in the Web URL field in the Site Map section.
For example, the root URL for the MC Express project is https://documentation.accruent.com/accruentaccess/MC/mc-express-help/.
-
-
If your Flare project is context sensitive, follow the steps below:
-
Select the Advanced tab.
-
Scroll down to the Alias File section.
-
Select your alias file from the Alias File drop-down menu.
-
-
If you are using only one Master Page for your project, select the Master Page you want to use from the Master Page drop-down menu.
-
Save your changes.